Introduction

The toolbar Options menu configures the script editor — how composites and entities are shown, Viewport behaviour, save/launch helpers, and more. It opens from the Options button on the main toolbar, between View and Help:
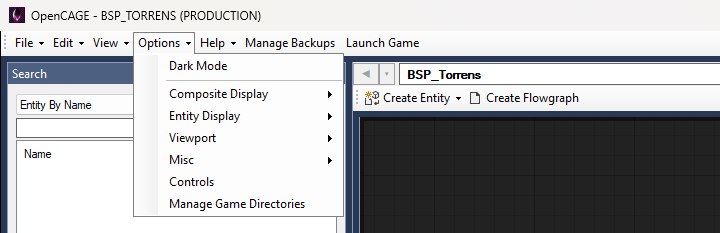
The OpenCAGE toolbar with the Options menu open, listing Dark Mode, Composite Display, Entity Display, Viewport, Misc, Controls and Manage Game Directories.

Composite Display, Entity Display, Viewport and Misc open submenus, mostly of checkboxes that stick between sessions. Controls opens a shortcut reference, and Manage Game Directories opens the multi-install manager.

The menu stays open after you tick something, so you can set several options in one go — it closes on an outside click, on Escape, or when it loses focus.

Dark Mode

The first item in the Options menu. Dark Mode switches the whole editor to a dark theme — the main window, dock panels, dialogs, the flowgraph canvas and the resource editors. Below is the script editor with it on:
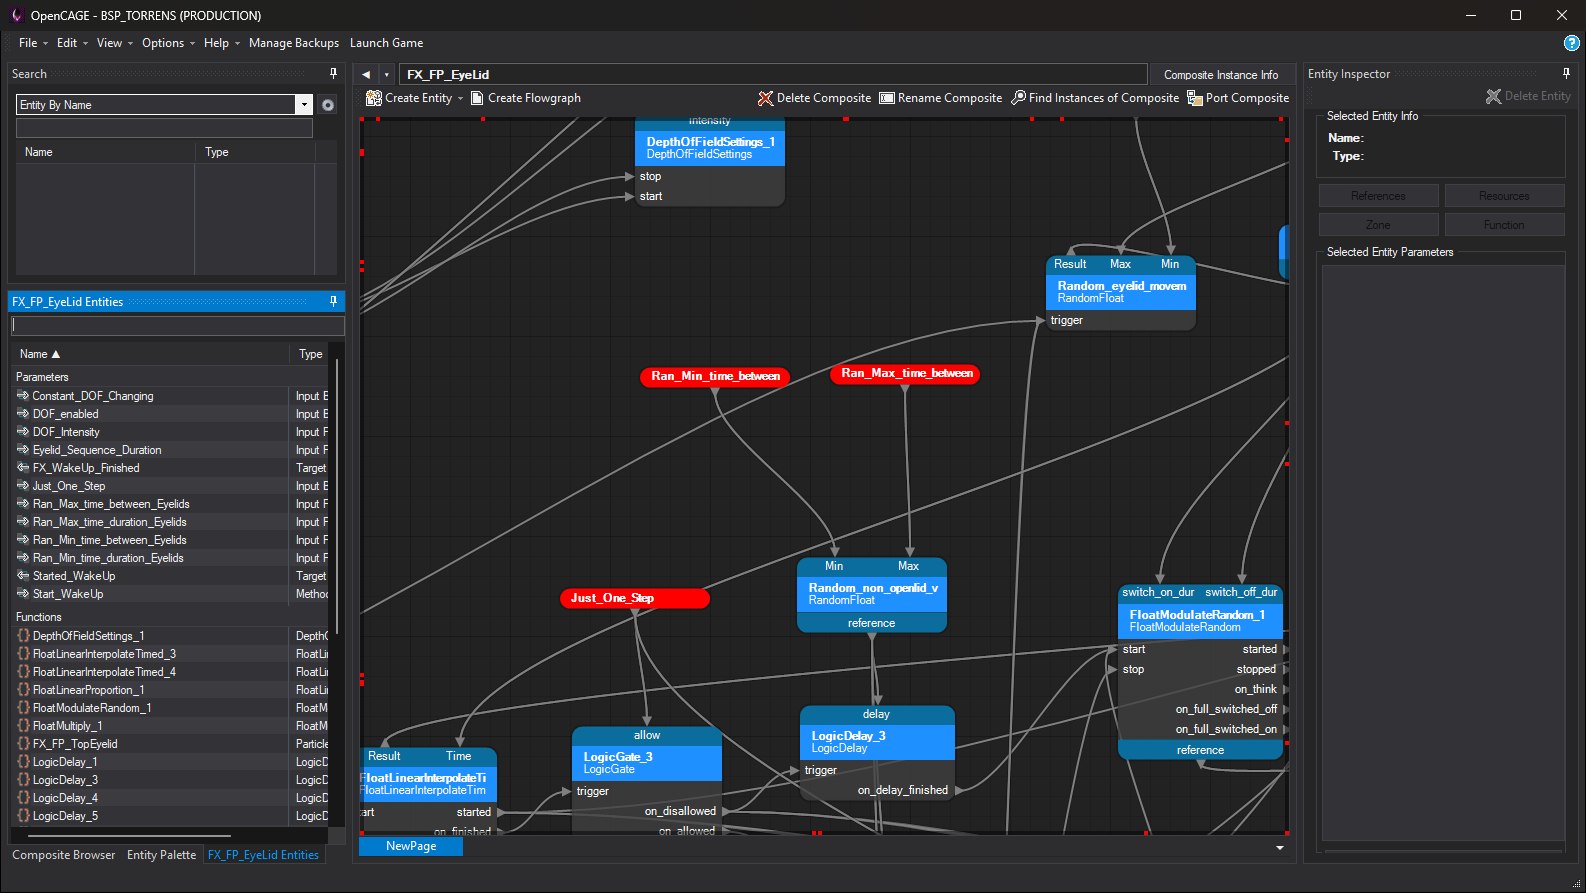
The OpenCAGE script editor with Dark Mode on: dark search panel, entity list, flowgraph canvas and inspector.

Themes swap live: you don't need to reload the level or restart OpenCAGE, and any windows you already have open re-theme with the rest. The docked panels are rebuilt in place to pick up the new theme; in the rare case that can't be done, OpenCAGE offers to restart to finish the switch. The setting is remembered between sessions and is off by default.

Composite Display

  • Use File Browser Composite Viewer — switches the composite list to a file-browser style panel (off by default).
  • Search Only Composite Names — composite search matches only the composite name, not folder path segments (off by default).

Entity Display

The Entity Display submenu controls how entities and their flowgraph nodes are shown, coloured and removed. Below it is open with the default ticks:
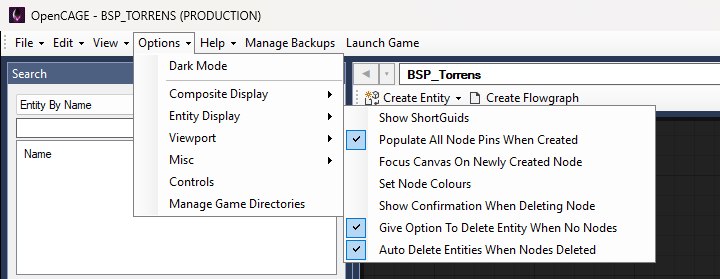
The Options menu with the Entity Display submenu open, listing Show ShortGuids, the node pin and canvas focus options and Show Confirmation When Deleting Node.

  • Show ShortGuids — shows entity IDs (ShortGuids) in lists, names, breadcrumbs, aliases/proxies, and global search (off by default).
  • Populate All Node Pins When Created — new flowgraph nodes get every pin added automatically (on by default).
  • Focus Canvas On Newly Created Node — moves the flowgraph view to a node as soon as you add it (off by default).
  • Show Confirmation When Deleting Node — asks before removing a flowgraph node (off by default; removing a node is undone with Ctrl+Z like any other edit).

Node colours aren't set here any more: each node is coloured by its type, and the colours aren't configurable.

Nor is there a choice about what happens to an entity when its last node is removed. It's deleted with the node — unless it's something the level places in the world (a model, a light or another of the types on the Viewport's Create menu), or something else still refers to it: a TriggerSequence, a CAGEAnimation, a proxy or an alias. Those are left in the composite without a node. Hold Shift while removing nodes to delete their entities outright, whatever they are. The nodes and any entities that go with them undo as one step.

Viewport

Full Viewport usage is covered in the Viewport docs. The submenu is shown below with the Viewport enabled and the Selection Highlight Mode list open; everything under Enable Viewport is greyed out while the Viewport is off.
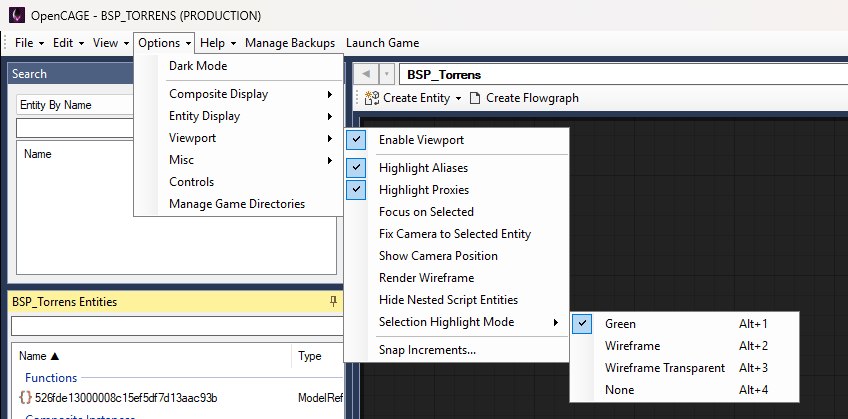
The Options menu with the Viewport submenu open, showing Enable Viewport, the highlight and camera toggles, Selection Highlight Mode with its four modes, and Snap Increments.

  • Enable Viewport — turns the 3D Viewport on or off (on by default). Turning it off closes the 3D view and greys out the rest of this section. Turning it on again with unsaved changes asks whether to save first, because the Viewport reads the level from disk: Yes saves and opens it now, No leaves it to open the next time a level is loaded. See Enabling & Disabling the Viewport.
  • Highlight Aliases — orange highlight on entities targeted by parameterized aliases in the active composite (on by default).
  • Highlight Proxies — blue highlight on proxy targets when you've stepped into a nested composite (on by default).
  • Focus on Selected — moves the camera to frame an entity whenever you select one (off by default).
  • Fix Camera to Selected Entity — keeps the camera locked on the selection as it moves, rather than framing it once. Turning this on turns on Focus on Selected too; turning Focus on Selected off turns this off with it (off by default).
  • Show Camera Position — shows camera X/Y/Z while moving (off by default).
  • Render Wireframe — draws ModelReference meshes as wireframe (off by default).
  • Render Galaxy — draws the level's own starfield (its GALAXY.ITEMS_BIN) as the Viewport's sky, on black, the way the game does (on by default). Off, the Viewport shows its plain sky. A level with no galaxy keeps the plain sky either way, and Generate Galaxy in the Galaxy Editor updates the Viewport straight away. Planets aren't drawn in the sky.
  • Hide Nested Script Entities — hides render previews for script entities in nested composites (off by default). Models are drawn regardless; the ModelReference render filter is what hides those.
  • Selection Highlight Mode — how the Viewport marks the selection: Green (a tint over the mesh, the default), Wireframe (the mesh's edges drawn over it), Wireframe Transparent (edges only, with the surface hidden) or None. Alt+1 to Alt+4 switch between them in the Viewport.
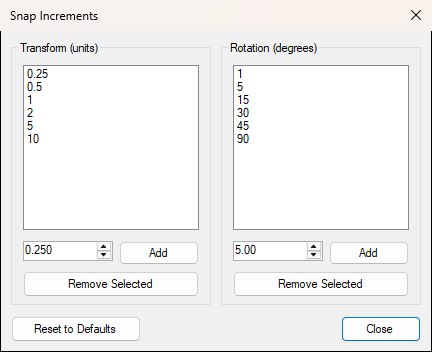
  • Snap Increments… — opens the Snap Increments window shown below, which edits the values offered by the Viewport's Transform Snap and Rotation Snap menus. Type a value under either list and press Add, or select an entry and press Remove Selected; each list keeps itself sorted. Off never appears here because the menus always offer it and it can't be removed. Reset to Defaults restores the shipped lists. If you remove the increment currently selected, the nearest remaining one takes over. The menus update as you edit.

    The Snap Increments window with separate lists of transform and rotation snap values, Add and Remove Selected controls, and Reset to Defaults and Close buttons.

    The shipped lists: 0.25 to 10 units, and 1 to 90 degrees.

Misc

The Misc submenu gathers the save, launch, layout and model-preview helpers. Below it is open with the Viewport enabled:
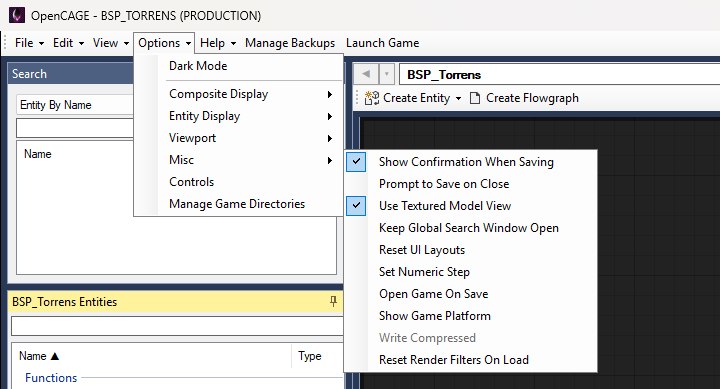
The Options menu with the Misc submenu open, listing the save, model view, search window, layout, numeric step, launch and platform options, with Write Compressed greyed out.

Write Compressed is greyed out because it only reports the loaded level's state; Reset Render Filters On Load is listed only while the Viewport is enabled.

  • Show Confirmation When Saving — shows a “Saved changes!” popup after a successful save (on by default).
  • Prompt to Save on Close — asks whether to save when you close OpenCAGE with a level open (off by default). Independent of the unsaved-changes indicator, which always flags in the taskbar once you've modified something.
  • Use Textured Model View — model previews try to load textures/materials (on by default).
  • Keep Global Search Window Open — after jumping to an entity from global search, the search window stays open (off by default).
  • Reset UI Layouts — restores the default window size and dock panel layout. If the Viewport is open, it's kept and repositioned.
  • Set Numeric Step — sets how much position and rotation values change when you nudge numeric fields in inspectors (defaults: position 0.1, rotation 1.0).
  • Open Game On Save — after save, launches into the level you're editing. Uses some of the same patch flags as Launch Game, but skips extras from that dialog such as Cinematic Tools / Hot Reloading (off by default).
  • Show Game Platform — appends the detected platform (e.g. Steam) to the window title — handy with multiple installs open (off by default).
  • Write Compressed — status only: shows whether the loaded level's Commands are compressed. Not user-togglable.
  • Reset Render Filters On Load — when loading a level, turns all Viewport render filters off (shown only if the Viewport is available; off by default).

Saving an uncompressed level now always writes both the PAK and BIN forms of the Commands data — that used to be an option here and no longer is. Compressed levels still save as BIN only.

Controls

Opens the read-only Controls window shown below, with shortcut reference tabs:
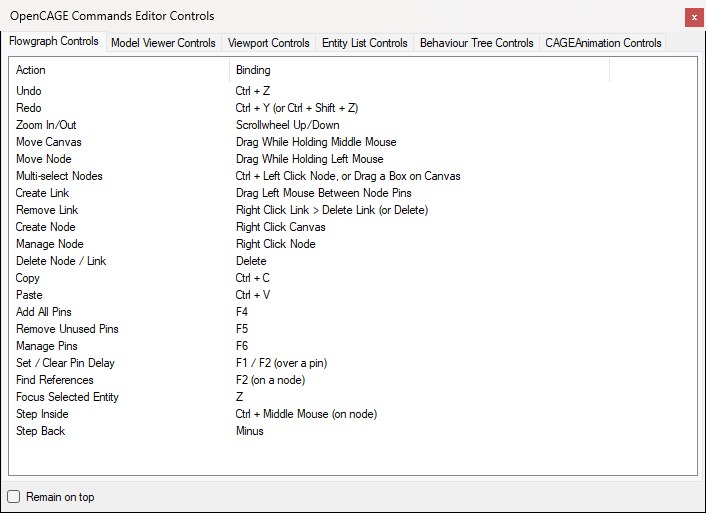
The Controls window on its Flowgraph Controls tab, listing each action beside its key or mouse binding, with the Remain on top checkbox at the bottom.

The window opens on the Flowgraph Controls tab. Each tab is a read-only Action / Binding list.

  • Flowgraph Controls — undo/redo, zoom, pan, move nodes, links, pin shortcuts, copy and paste, step in/out
  • Model Viewer Controls — zoom, rotate, move, recenter
  • Viewport Controls — camera, selection and multi-select, step in/out, gizmos, snapping, duplicate, hide/unhide (see also the Viewport docs)
  • Entity List Controls — moving through the list, delete, copy and paste, stepping into composite instances
  • Behaviour Tree Controls — shortcuts for the Behaviour Tree Editor
  • CAGEAnimation Controls — timeline and curve shortcuts for the CAGEAnimation Editor

Longer lists scroll, but the window can be resized to show more at once. Viewport Controls is the longest of the six — below it is shown with the window enlarged so every row is in view:
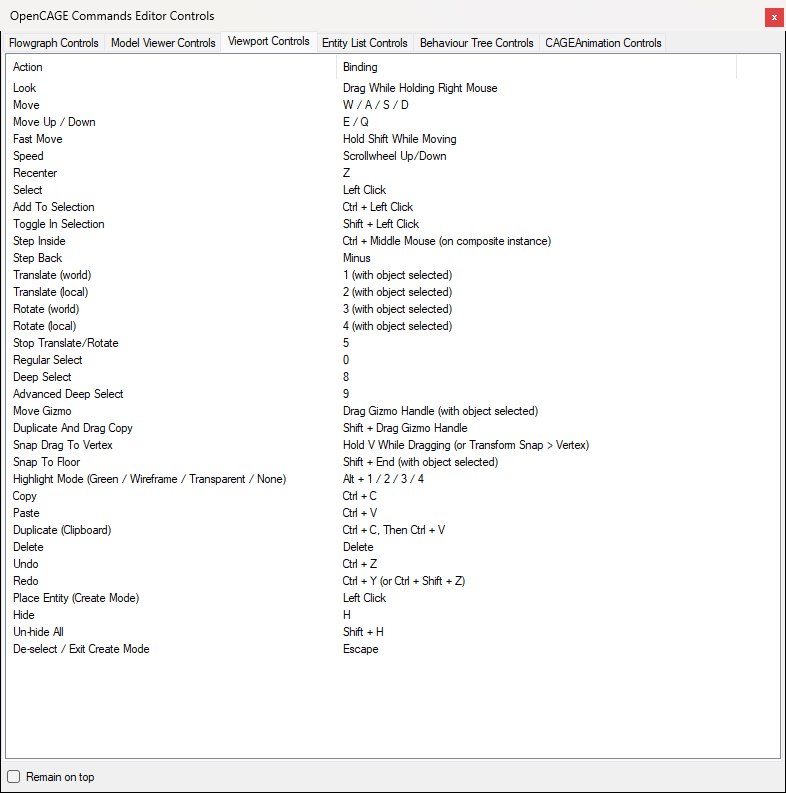
The Controls window on its Viewport Controls tab, enlarged to show every camera, selection, gizmo, snapping, clipboard and hide binding.

Tick Remain on top to keep the window above the editor while you work, so you can refer to it without it disappearing behind the main window.

Manage Game Directories

Opens the Game Directory Manager — register installs, set the default, and open extra editor windows. Available only in the primary OpenCAGE window (the one launched from Steam), not in child editors opened for other installs. If the primary window is closed while child editors are still open, one of them takes over and the item appears in its menu a few seconds later.

Full walkthrough: Multiple Game Installs.