The Viewport is OpenCAGE's 3D view of the level — part of the script editor, shown above the composite display. Use it to place triggers, models, markers, and anything else that benefits from seeing the level in context.
This guide covers navigating the scene, selection, deep select, transform gizmos, and render filters.
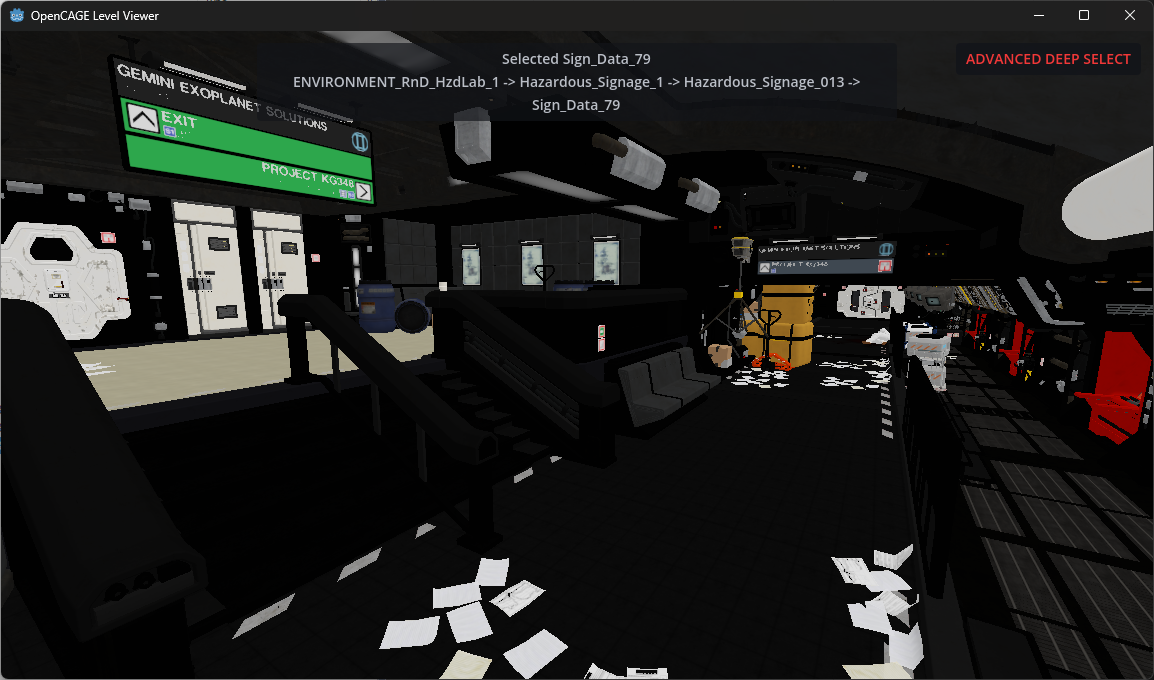
When you load a level, the Viewport appears automatically (unless you've disabled it — see below). While the scene is filling in, OpenCAGE shows a Populating … in viewport… progress state.
Selection and transforms you make in the Viewport are the same edits as in the rest of the script editor — hierarchy, parameters, and the 3D view stay on the same selection.
The Viewport toolbar covers Selection Mode, gizmo Control, Create (entity placement), State Info (navmesh / cover overlays), Transform Snap, and Rotation Snap.
Steam includes a launch option that starts OpenCAGE with the Viewport turned off. Use that if you want lower memory usage and faster load times, knowing you won't get the 3D view.
In Steam: open OpenCAGE's properties → Launch Options, and choose the option that disables the Viewport.
If you run several OpenCAGE windows for different game installs, Options → Manage Game Directories has Launch other editors without viewport so those extra windows skip the 3D view. See Multiple Game Installs.
To look around the scene, hold the right mouse button and drag. Whilst doing this, you can use W, A, S, and D to move the camera in 3D space. Q and E move down and up. Hold Shift to move faster.
Hold the middle mouse button and drag to pan the camera without changing your viewing angle.
Scroll the mouse wheel to adjust movement speed — a small readout appears in the corner when you change it.
Press Z to recenter the camera on whatever is currently selected.
When a level first loads, the camera will frame the level automatically unless you're already drilled into a nested composite with something selected.
Click an entity in the hierarchy or flowgraph and it highlights in the Viewport; click something in the Viewport and the hierarchy jumps to that entity.
Left-click an object in the Viewport to select it. By default, this selects the relevant entity in the composite you're currently viewing — for example, clicking a model inside a composite instance will select that composite instance entity, not the inner model directly.
Selected entities are highlighted in green. You can click empty space or press Escape to deselect.
Entities outside the composite you're currently editing are dimmed and can't be picked, which makes it easier to focus on the area you're working on. Step into a nested composite and the Viewport scope updates to match.
If Highlight Aliases is enabled under Options → Viewport (on by default), entities targeted by parameterized aliases in the active composite are shown with an orange highlight. The selected entity itself shows green rather than orange.
If Highlight Proxies is enabled, entities targeted by proxies are shown with a blue highlight when you've stepped into a nested composite.
You can click on render previews too — not just model references. Box volumes, position markers, character previews, spline paths, sound icons, and other filtered entity types are all selectable (see more below).
Sometimes you want to select something deeper in the hierarchy — an entity inside a nested composite, for example. That's what deep select is for.
Set the select mode from the Viewport panel's Selection Mode toolbar, or with these number-row keys (not the numpad):
Modes are chosen directly — you don't cycle through them with a single key.
Press - (minus) to step back out one level in the hierarchy — useful if you've drilled in too far. You can see the full hierarchy in the bar at the bottom of the OpenCAGE window, and also navigate back there too.
In Cathode scripts, entities inside a nested composite aren't directly selectable from the parent composite you're viewing — the script editor needs a path to reach them. That's what aliases are for: an alias in your current composite points at a chain of entities through composite instances, ending at the thing you actually want to work with.
Deep select creates that path for you automatically. When you deep-select something, OpenCAGE looks for an existing alias in the active composite whose path matches the entity chain you clicked through. If one already exists, it selects that. If not, it creates a new alias pointing at the right depth.
In Deep Select mode, each left-click on the same piece of geometry goes one composite level deeper — first click might select the composite instance, the next click the entity inside it, and so on. The alias's path grows to match. In Advanced Deep Select mode, a single click builds the full alias path straight to the deepest entity in one go.
Aliases created this way start out parameter-free — they're temporary helpers for navigation. If you click something else without having done anything to the alias, OpenCAGE removes it again so your composite doesn't fill up with unused aliases. Once you move an alias with the transform gizmo (which adds a position override), or otherwise give it parameters in the main editor window, it becomes a permanent part of your scripts — the same as if you'd created it manually in the flowgraph.
This is separate from the orange Highlight Aliases option, which shows entities that already have parameterized aliases in the composite you're editing. Deep select is about creating and navigating through aliases on the fly; the orange highlight is about visualizing overrides you've already set up.
Note — moving an entity via deep select (an alias) will override the position defined within the child composite. This works in a hierarchy, so aliases at the root level will override ones below. Read more about aliases in the Scripting Intro.
Once you've selected an entity, you can move and rotate it in the Viewport with the transform gizmo. That updates the entity's position parameters like any other edit.
With an entity selected, choose a gizmo mode from the Viewport Control toolbar, or with these number-row keys:
Click and drag the coloured gizmo handles to transform the entity. The current mode is shown in a small HUD.
Use Transform Snap and Rotation Snap on the Viewport toolbar to snap movement and rotation to stepped values while dragging.
An entity with more than one transform parameter only has the relevant one updated when you drag it, rather than all of them.
The Create dropdown on the Viewport toolbar turns the view into a placement tool. Pick a function type from the dropdown and the button changes to Create: <type>; clicking in the Viewport then creates a new entity of that type at the position you clicked, in the composite you're currently editing.
This is much quicker than adding an entity from the palette and then dragging it into place — particularly for the things you place by eye, like trigger boxes, position markers and pathfinding nodes.
Choose None to leave create mode and go back to normal selection.
Select an entity in the Viewport and Ctrl+C / Ctrl+V copies and pastes it, keeping all of its parameters. The same clipboard works on the flowgraph, so you can copy in one view and paste in the other, and entities can be pasted into a different composite entirely.
This replaces the old Duplicate option. See Cathode Scripting Introduction for what happens to links and node layouts when you paste on the flowgraph.
Need to temporarily get something out of the way while you work on geometry behind it? With an entity selected, press H to hide it in the Viewport. This is display-only — it doesn't delete or modify anything in your scripts.
Press Shift + H to unhide everything you've hidden in the current composite scope.
Hides reset automatically when you navigate to a different composite or step into/out of a composite instance, so you won't accidentally carry hidden state across contexts.
Not everything in a Cathode level is a rendered model. The Viewport draws previews for many function entity types so you can see triggers, markers, splines, characters, and more.
Preview types include:
Each preview type has an associated render filter, colour-coded in the list. Use the docked Render Filters panel (alongside Search / Composite Browser by default) to toggle individual function types on or off. This is useful for decluttering busy levels — hide box volumes you don't care about, for example, while keeping position markers visible.
Coverage is broad: trigger and camera volumes, NPC and navmesh areas, cover and spotting exclusion areas, sound barriers, environment zones and network nodes, particle, ribbon and GPU emitters, decals, refraction and water surfaces, pickups, and the pathfinding node types all have their own filter.
Under Options → Viewport, enable Hide Nested Script Entities to stop showing entity previews defined in nested composites. ModelReference entities are always shown regardless of render filter settings.
Under Options → Misc, Reset Render Filters On Load clears your filter toggles whenever a level loads.
Two extra filters at the bottom of the panel aren't tied to a function type at all — they draw scene geometry the game never renders:
Both are drawn in a flat filter colour and are off by default. They're the quickest way to check that geometry you've moved or ported has collision where you expect it — see Save and Build.
The State Info dropdown on the Viewport toolbar draws generated NPC state resources over the level. For each of the level's states you can show either:
Levels have more than one state — geometry that opens, closes or changes as the mission progresses — and each has its own generated navmesh and cover, so pick the state you're interested in. Choose None to turn the overlay off.
This is what these systems will actually be at runtime, so it's the right place to check the result of a build.
Most Viewport behaviour is controlled from Options → Viewport (also listed under Options):
Also useful:
