Every level in Alien: Isolation carries its own copy of everything it uses. A model in one level's data isn't visible to another, so copying a composite between levels means copying every asset it depends on too. OpenCAGE does that for you, in two forms:
.ocp file holding the composites and everything they use, which can be imported into any level, on any install, on any machine. It's how you share a modded composite with someone else, or carry one between the game installs you have set up.Whichever route you take, the composites arrive with the composites they instance and every resource they reference — it's the same porting logic underneath, so every composite can be ported. The same picker is also how Create Level seeds a brand-new level. All four commands sit in the File menu, as shown below.
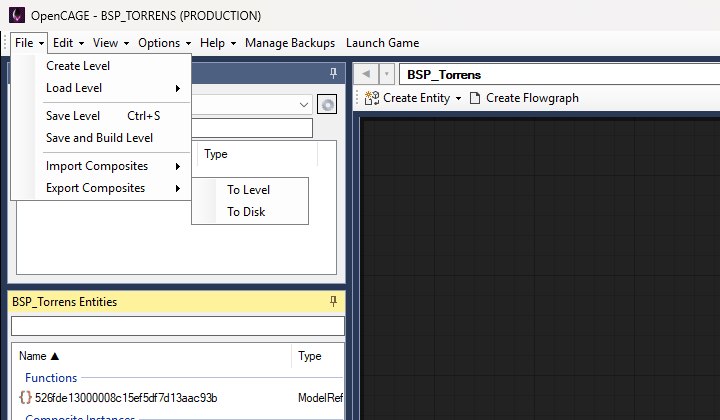
File → Export Composites → To Level pushes composites from the level you have open into one or more other levels on disk. Each destination is loaded, written to and saved. The window is titled Port Composites and looks like this:
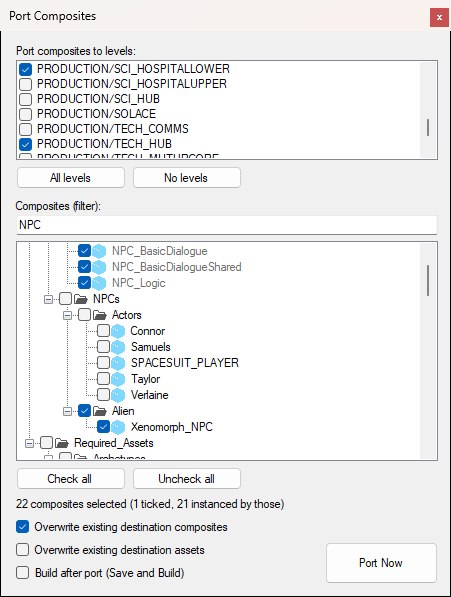
Export to Level: two destinations ticked and the tree filtered to NPC. Xenomorph_NPC is the one ticked; NPC_Logic and the two NPC_BasicDialogue composites it instances are ticked and greyed for you, and the count underneath includes all 21 that come with it.
The tree shows the composites of the level you have open, in the folders their names spell out, with every folder open. Tick the ones to port — ticking a folder ticks everything in it, and to narrow the tree, type in the box under Composites (filter): and press the Search button beside it (or Enter). Only the composites whose names contain every word you typed are left, whatever their case; typing alone doesn't change the tree, as filtering a big level on every key press made the window stop responding. Empty the box to see every composite again. Ticks are kept as you search, Check all ticks whatever the last search is showing, and Uncheck all clears the whole selection, shown or not. Composites that a ticked one instances are ticked for you, greyed out and can't be unticked while it's ticked: a port always brings them along, so the tree shows what will actually move, and the count under it says how many were ticked and how many came with them. Then choose where they go:
Port Now starts the port. Each destination level is loaded and the composites and their assets transferred; Alien: Isolation is then closed if it's running, and the level is saved — with a progress window for each stage. The summary at the end counts what was ported, including the composites yours instance. The destination keeps its own flowgraph pages and modified-parameter marks across the save, and gains yours for what arrived. OpenCAGE is out of action for the whole run — the editor window is disabled until the last level is saved — and if a level fails part-way, the message says which levels were written and which one to restore from the Backup Manager.
File → Import Composites → From Level pulls composites from any other levels into the level you have open. The import happens in memory, and nothing touches disk until you save. The window, titled Import Composites Into followed by the open level's name, is shown below.
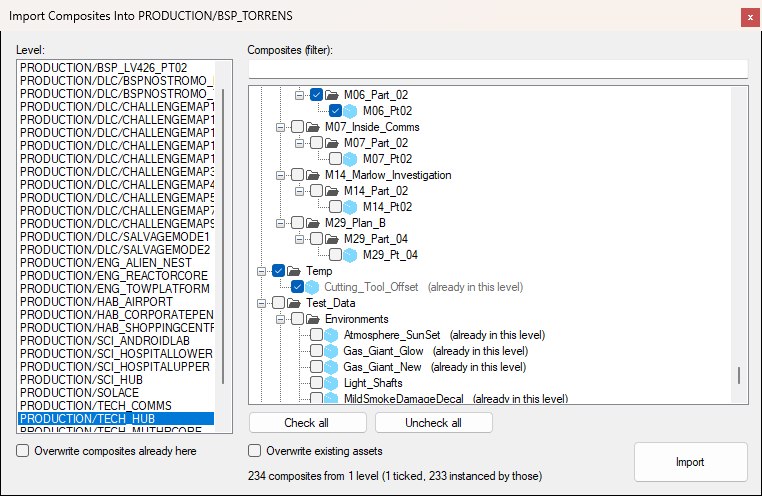
Import from Level into BSP_Torrens: TECH_HUB chosen as the source and its M06_Pt02 mission composite ticked, which brings 233 more with it. Composites the open level already has are marked (already in this level).
Pick a source from the Level list on the left and its composites appear in the same tree, read straight from that level's script table — the level itself isn't loaded, so switching between sources is quick. Tick what you want (folders, Search and check-all work as in the export dialog, with the last search kept when you pick another level, and the composites a ticked one instances are ticked and greyed for you; composites the open level already has are marked (already in this level), so you can see what an import would replace rather than add), then switch to another level and tick more: one import can draw on any number of levels, and the summary line keeps count across them.
Import ports everything into the level in the editor and refreshes the composite browser. Tick Open composite after import, under the overwrite options, to have the first composite you imported opened as well — in the editor and in the Viewport. It's off by default, and the window remembers your choice (the Import from Disk window shares it). Left unticked, whatever you had open stays open, or you're put back where you were if the import had to close it: the same composite, stepped down through the same instances, with the same entities selected, in the editor and the Viewport. A composite the import replaced comes back as its new copy, and if an instance you'd stepped through isn't in the new copy, you land as far down as the path still goes. A summary reports what arrived — composites, renderables, collision mappings and physics systems. Nothing has been written to disk at this point: save the level to keep it, or reload without saving to throw the import away.
If an import stops part-way (the message will say so), the level in the editor may hold a partial import. Reload it without saving if in doubt.
A level-to-level port only reaches levels in the install you're editing. An OpenCAGE Composite Package takes the same content out of the game entirely: the composites, every composite they instance, all of their resources and your editor metadata, in one compressed .ocp file that any copy of OpenCAGE can import into any level. Nothing about the destination has to match the source — a composite built in TECH_HUB on one machine can land in a brand-new level on another.
With the source level loaded, open File → Export Composites → To Disk. The window is shown below.
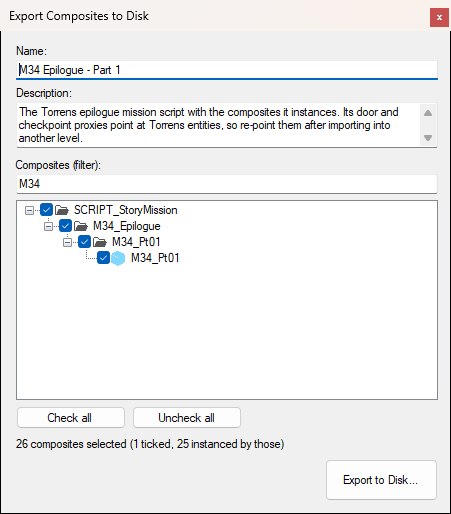
Export to Disk: a name and description at the top, then the same tree, here filtered to M34. The summary counts the ticked M34_Pt01 composite and the 25 it instances.
At the top, say what the package is:
Below that the tree works like the level export — tick composites or folders, Search, Check all / Uncheck all, with what a ticked composite instances ticked and greyed for you — but there's no destination to choose. Export to Disk... asks where to save the file (it suggests the package name, or the last part of the composite's name, or <LEVEL>_composites for several) and writes it. The level you have open is not modified.
What goes in:
GLOBAL and PAUSEMENU are left out even though every composite can reach them — every level already has its own — unless you tick them yourself.
Behind the scenes OpenCAGE ports into a blank temporary level, saves it and packs the result, so an export takes about as long as saving a small level. The summary tells you how many composites went in, including the instanced ones, and how big the file is. Textures dominate: a composite that uses a lot of unique textures makes a large file, while a handful of script-only composites make a tiny one.
There are three ways to open an .ocp file, and they all lead to the same import window:
.ocp as its own file type each time it starts (for your Windows account only — nothing needs administrator rights), so an .ocp opens in OpenCAGE from Explorer like any document. If OpenCAGE is already running, the file is handed to it and the import window opens there, in front. If it isn't, OpenCAGE starts — through Steam, so Steam needs to be running — and opens the file once it's up. Several files selected together open one after another.Whichever way it arrives, a package opened while a level is still loading waits until the load has finished, and one opened while another import window is up waits its turn.
The import window reads the file's header — nothing is unpacked yet — and shows the package's name in bold with its description under it (either is left out if the author didn't give one). More info… shows where it came from: the file, the source level, when it was exported, the OpenCAGE version and platform that wrote it, and how many composites and files it holds. A warning appears in orange under the description if the file was made on a different platform or by a different version of OpenCAGE.
A package is imported as it is: the tree shows every composite it holds, with every folder open, and there's nothing to pick — the ones ticked at export are ported and bring the rest with them, exactly as they were packed. The box over the tree has the same Search button as the other windows, for finding a composite in a big package. Three options remain — the two overwrite options on by default, the third off:
With a level open in the editor, Import behaves exactly like an import from a level: everything is ported into the level in the editor, the first imported composite opens if you asked for it (otherwise you stay where you were, or are put back there if the import had to close the editor), and a summary counts what arrived. Flowgraph layouts and pin info arrive with it, so the flowgraphs look as they did where they were exported. One thing can differ: proxies to things the destination level doesn't have — a mission script's proxies to its own level's doors, say — arrive unresolvable, and the summary says so. See Unresolvable Proxies. Nothing is written to disk until you save.
Platforms. The PC storefronts — Steam, Epic Games Store, GOG and the Windows Store — share one set of level files, so a file from one imports cleanly into another and the dialog only mentions the difference. Any file not from one of those — Switch, iOS/Android, Mac/Linux, or one whose platform can't be read — is flagged as unlikely to work. It isn't refused — you may know better than the header — but expect problems.
A package opened before any level is loaded — from File → Import Composites → From Disk, double-clicked or dropped — still opens the import window, with a Destination panel added, because the import then goes to a level on disk instead of the one in the editor (Open composite after import disappears, since there's nothing in the editor to open it into):
Each level keeps its own flowgraph pages and modified-parameter marks across the save, and gains the package's for what arrived. Afterwards, for a single level, OpenCAGE offers to open it. If a level fails part-way, the message says which levels were written and which one to restore from the Backup Manager.
OpenCAGE is out of action for the whole run — the editor window is disabled until the last level is saved, with the progress windows showing where it's got to. Don't force-close it part-way: the level being written at that moment would be left incomplete.
An .ocp file is one gzip stream. It starts with a short header holding a JSON manifest: the format version, the OpenCAGE version and platform that wrote it, the source level and export time, the package's name and description, the list of composites with their IDs (and which of them were ticked), and every file in the archive with its length. After the manifest come the files of the temporary level the composites were ported into — the script (COMMANDS.PAK, which carries your layout, pin and parameter-modification tables inside it) and the resource paks — followed by a terminator.
The manifest comes first so the import window can read it without unpacking anything, and every file's length is checked on import: a truncated or damaged file is refused rather than half-imported. The format version in the header is the container's, so a later OpenCAGE can tell exactly what it's reading.
A port carries far more than the script. Everything the composite's entities point at is brought across and rebound to the destination level's own indices:
Navmesh barrier, traversal segment and ExclusiveMaster state references ride along on the copied entities as they are; the data behind them belongs to the destination and is regenerated when it's built (see After the Port).
Shared Havok proxies and physics systems are tracked as they're imported, so a composite that uses the same collision proxy in twenty places doesn't import twenty copies of it — and a composite instanced by several of the ones you picked is only ported once.
A ported composite has arrived in the destination level, but the destination level's derived data doesn't know about it yet — the new geometry has no baked lighting, the navmesh doesn't route around it, and the sound network hasn't seen it.
When exporting to a level, or importing a package into a level on disk, tick the build option to have OpenCAGE run a build on each destination as part of the port. Otherwise — and always after an import into the level in the editor, which only changes it in memory — use File → Save and Build Level yourself once the composite is placed where you want it.
Bear in mind that a build takes minutes per level. Porting to all levels with a build is an operation to start and walk away from.
A proxy points at an entity by its path from the root of the level, so a proxy only means something in the level it was written for. A mission script ported to another level — or another install — brings its proxies with it, but the doors, triggers and checkpoints they pointed at aren't there. Those proxies are unresolvable: they resolve to nothing until they're pointed somewhere that exists.
OpenCAGE keeps them rather than tidying them away. The proxy stays in the composite with every link through it, so the wiring of the script survives; what it pointed at is remembered (its function type, or the composite it was an instance of), so the node keeps the right pins. The summary at the end of a port or import lists every unresolvable proxy by composite, and the same message appears for each destination when porting to several levels.
In the flowgraph an unresolvable proxy has no target to take its colour from: it's drawn in the plain light grey with a ! marker (a circle at the right-hand end of its title), and the links into and out of it are drawn dark red, so a script's broken spots stand out at a glance (see Node Colours). Its subtitle reads UNRESOLVABLE PROXY, followed by TO: and what it used to point at when this level has a name for that. The inspector says the same, and shows the stored path as far as it still leads anywhere.
To mend one, right-click its node and choose Change Proxy Target..., or press Change Target in the inspector. The usual proxy picker opens (titled Change Proxy Target), rooted at the level's root composite and already opened as far down the old path as still exists, so you land where the break is. Pick the entity that should stand in — the door that plays the same role in this level, say — and the proxy points there, keeping its name, its parameters and every link. The node takes its new target's colour, the marker goes and the links return to normal; undo puts it back the way it was.
Nothing forces you to fix them before saving: an unresolvable proxy is saved like any other and can be re-pointed later. Until it is, though, the part of the script that goes through it does nothing in the game, and a proxy pointed at the wrong kind of entity won't do what the script expects either.
A retail level never contains an unresolvable proxy, so a node with the (!) marker is always something a port, an import or a deletion did — a proxy also stops resolving when the entity it pointed at is deleted from the level. The same picker re-points those.
.ocp file.display_model) rather than instancing it, so the DisplayModel:NAME composite it draws with isn't ticked for you along with the composite that spawns it, and doesn't come along. Tick it too, unless the destination already has one of that name.