Introduction

Every level OpenCAGE could open used to be one that shipped with the game. File → Create Level, the first item on the script editor's File menu (shown below), makes a new one from scratch: it builds the level folder, seeds it with the scripts and data every level needs, optionally brings composites (and everything they use) across from other levels, registers the level with the game, and opens it in the editor.
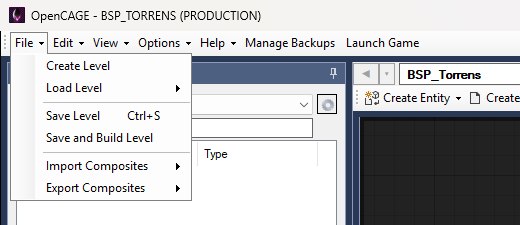
The script editor's File menu with Create Level at the top.

A new level is a real level as far as the game is concerned. It lives in DATA/ENV/<NAME> beside the shipped ones, it appears in the Launch Game level list and the Backup Manager, and it goes through Save and Build like any other.

Creating a Level

Open File → Create Level. The dialog, shown below, has three parts:
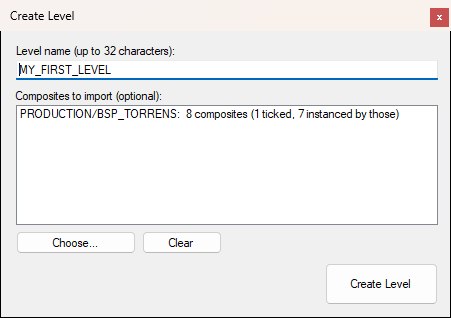
The Create Level dialog: a level name box, the list of composites chosen for import with Choose and Clear buttons beneath it, and the Create Level button.

The Create Level dialog with a name entered and a pick from BSP_TORRENS queued for import: one composite ticked, and the seven it instances counted with it.

  • Level name — letters, digits and underscores, up to 32 characters. It's stored upper-case, and a name that already exists is refused. The limit is real: Launch Game boots the game straight into a level by writing its name into the game executable, and that space is fixed.
  • Composites to import (optional) — click Choose… to open the composite picker (titled Choose Composites To Import, shown below). Pick a source level from the Level list on the left, tick the composites you want in the tree (folders tick everything in them; there's a filter box, plus Check all / Uncheck all), then switch to another level and tick more if you like — a single pick can span any number of levels. Composites they instance are ticked and greyed for you, since they come along regardless, and the line beside OK, in the bottom-left corner, keeps count ("8 composites from 1 level (1 ticked, 7 instanced by those)"). OK takes you back to the dialog, where the list under Composites to import shows one line per source level with its count; Clear empties it. With nothing chosen, the level starts with just GLOBAL, PAUSEMENU and the required assets.
  • Create Level — Alien: Isolation is closed if it's running, then a progress window follows each stage: creating the level, porting each source level's composites, and saving. A Complete message tells you what arrived ("Created 'MY_FIRST_LEVEL' with 8 imported composites!"), and the new level loads in the editor.

The picker is the same Import from Level dialog described under Composite Porting, minus the Overwrite composites already here option — a level that doesn't exist yet has no composites to overwrite — and with OK in place of Import, since nothing is ported until the level is created. Overwrite existing assets is still offered, for when picks from several levels bring same-named models or textures. Open composite after import is shown too, but has no effect here: the new level is loaded as soon as it's created, and opens on its root composite. Ticking it only sets the default for the Import Composites windows. Composites you've saved as .ocp packages can be brought in once the level exists — even before it's opened.
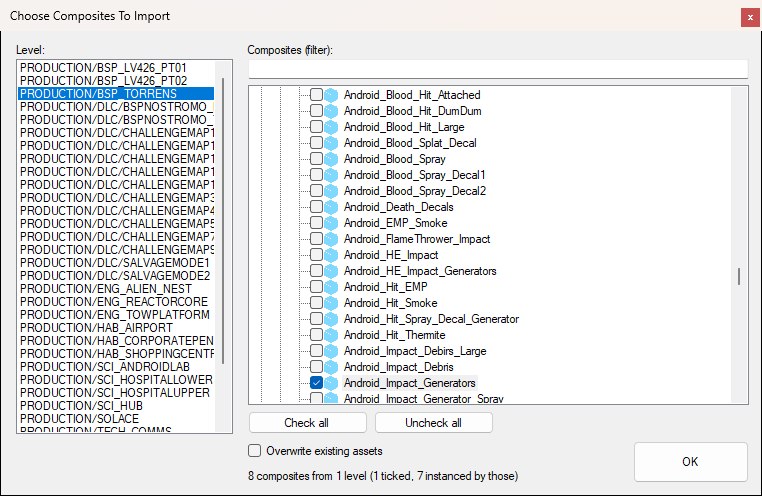
The Choose Composites To Import picker: a list of levels on the left and a folder tree of that level's composites on the right, with one composite ticked and the summary line beside OK counting the composites it instances.

The picker with BSP_TORRENS chosen and Android_Impact_Generators ticked. The line beside OK counts the seven composites it instances as well — they're ticked and greyed in the tree (out of view here), since they come along regardless.

What a New Level Contains

The level is built from FRONTEND, the menu level nothing else edits. A handful of a level's files can't be generated from nothing — behaviour trees, sound lookups, galaxy data, soundbank tables, material mappings and the collision and physics scaffolds — and those are copied from it, along with the engine's own materials that head every level's material table (the fallback and post-processing materials, the fog, water and light materials and so on — without them the game draws its HUD over a black frame), the block of required models the engine builds lights, particles and fog from, and the twelve movers that draw them. Everything else starts empty: no geometry, navmesh, lighting or sound network of your own until you add models and build.

On the script side you get:

  • GLOBAL and PAUSEMENU — the engine instances both on every level, so they're brought across intact
  • The required asset composites the game expects to find
  • An empty root composite named after the level — this is the one you'll open first and build your level in
  • Anything you chose to import, with its models, materials, textures, collision, physics and animations, and its flowgraph layouts. Composites that arrive without saved layouts get the default pages.

The level is also written into the game's package list straight away, so the game can find it without waiting for the next launch.

After Creating It

  • Add content. Place entities with the Viewport's create mode, drag composites from the Composite Browser into the Viewport or the flowgraph, import geometry with the Model Editor, or pull more in with File → Import Composites → From Level (or From Disk, for an .ocp package).
  • Build it. A new level has no navmesh, no collision or physics instances, no baked lighting and no sound network. Save and Build generates all of that from whatever you've placed — until you do, there's nothing to walk on.
  • Launch it. In Launch Game, tick Load straight into a level and pick your level from the list.

Tips & Caveats

  • Start from something that stands up. Importing a composite with floor and wall geometry (and its collision) at creation time is the quickest way to a level you can actually load into and walk around after a build.
  • Levels are keyed by folder name. The game's text-database and package lists refer to a level by its folder, so pick a name you'll keep.
  • The base is the campaign variant. FRONTEND carries the campaign versions of the shared sound and material tables; a level meant to sit alongside the DLC challenge maps will still work, but starts from the campaign data.
  • Back it up like any other level. Once it exists, the Backup Manager can snapshot it before builds.