A shipped Cathode level is not just its scripts and its models. Sitting alongside those is a large amount of derived data that the engine reads at runtime but never works out for itself: which surfaces receive which lights, where NPCs can walk, what a bullet collides with, where the alien can take cover, and how sound travels from room to room.
Creative Assembly generated all of that offline, in CAGE, whenever a level was built. If you move a wall in OpenCAGE and only write the scripts back, the wall moves — but its shadow, its collision, and the navmesh around it stay exactly where they were.
File → Save and Build Level (Ctrl+Shift+S) is the option that regenerates it — it sits directly under the plain Save Level in the File menu, as shown below. It performs a normal save, and then rebuilds the level's instanced data from whatever the level now actually contains.
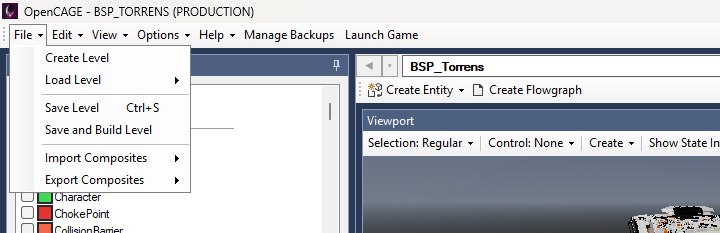
Save Level has the Ctrl+S shortcut and Save and Build Level has Ctrl+Shift+S. Both shortcuts also work while the Viewport has the focus.
This is the feature that makes it possible to add new geometry to a level and have the game treat it as real.
The File menu offers both (pictured in the introduction above), and they are not interchangeable:
Reach for Save and Build when you have:
A plain Save Level is enough when you have only edited script logic, parameters, links, or entities that have no physical presence in the world. It'll also work when moving geometry etc, but the collisions will stay in the old place.
Take a backup first. Building a level rewrites a lot of files at once, and there is no undo. Use the Backup Manager to snapshot the level before your first build of it — that is by far the quickest route back if something comes out wrong.
Everything below is regenerated from the level as it now stands. You do not choose between them individually — a build runs the whole pipeline.
Collision and physics instances are rebuilt to match where objects now are, including instances for newly scripted entities. This is what makes a moved wall solid in its new position rather than its old one. The Viewport can draw the generated collision over the level in solid cyan, as below — see Checking the Result for the filter that switches it on.
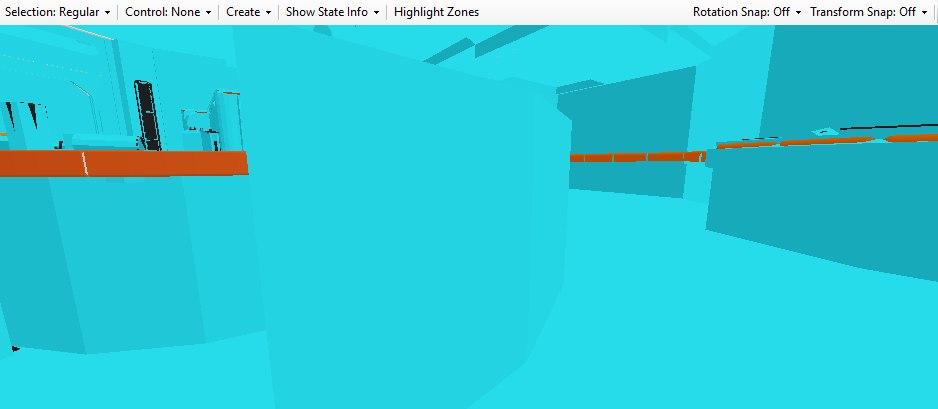
The same view of the Torrens canteen as the navmesh screenshot under Checking the Result, with the Collision Meshes render filter on. The overlay is opaque rather than a wireframe, so anything with collision becomes a cyan block — the chair nearest the camera fills the middle of the frame — and the ordinary render only shows through where the visible mesh reaches past its collision, as the orange table and bench tops do here.
You can inspect the generated navmesh and cover in the Viewport — see Checking the Result.
Runtime behaviour is configurable under View → Configuration Editors → Core Game → Radiosity (see Radiosity).
Sound networks and spaces are regenerated — the graph of rooms and the openings between them that the engine uses to route sound through the level and to decide which reverb applies where. Move a wall or open up a doorway and the sound propagation follows.
Radiosity is the one system where regenerating everything is not automatically the best answer. CA's original bakes were produced with far more time and tooling than a build in OpenCAGE can spend, so on a retail level the shipped lighting is better than anything rebuilt from scratch.
Because of that, a build patches the existing bake rather than replacing it: your new and moved objects are lit and folded into the level's existing lighting, and everything untouched keeps CA's original quality.
There are two cases where that isn't possible, and OpenCAGE falls through to a full regeneration instead:
When a level is fully regenerated, OpenCAGE records that fact in a small .META file next to the level's radiosity data. Later builds read it and keep fully rebuilding, rather than patching lighting that is already entirely ours.
A fully regenerated bake is dimmer and flatter than retail's — expect to spend some time on your lights afterwards. Live Link lets you place and tune lights in the running game, so you can get them right by eye before you build; the bounced light is only worked out by the build itself. If you have a pristine copy of a level's original radiosity, restoring it before you build will give you a better starting point than letting it regenerate.
While a build runs, the progress window shown below reads Instancing <level>…. The generation phase cannot report a percentage, so the bar runs as a marquee; once the generated data starts being written to disk the title switches to Saving <level>… and the bar fills as it does for a normal save. Expect it to take substantially longer than a plain save — minutes rather than seconds on a large level.

The progress window during the generation phase: the green block scrolls across the bar rather than filling it, because there is no percentage to show yet.
Once it's done, two of the generated systems can be inspected without leaving OpenCAGE. In the Viewport toolbar, the Show State Info dropdown lists every state the level has — State 0 (Default) plus one per ExclusiveMaster — and under each, Navmesh and Cover. Pick one and the generated data is drawn over the level, as below (navmesh in translucent blue, cover positions in orange); the button relabels to show what is active, picking the same entry again turns it off, and None at the top of the list clears both. If a region of your new geometry has no navmesh over it, NPCs will not walk there.
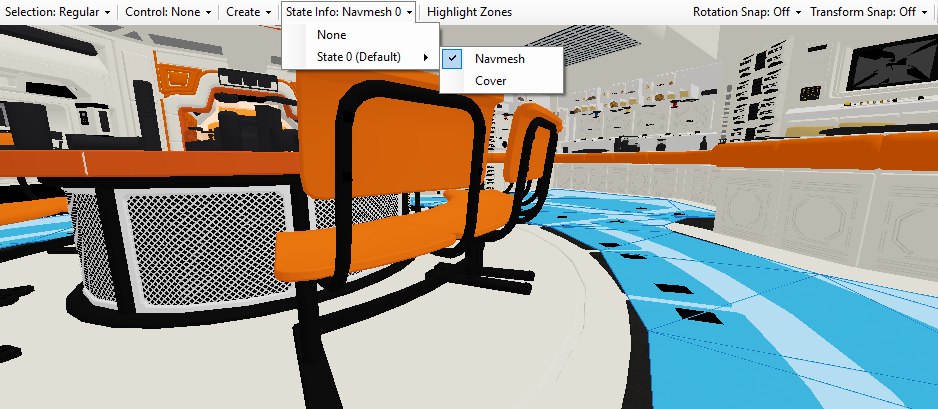
State 0 (Default) → Navmesh ticked on BSP_TORRENS: the walkable navmesh shows in blue across the canteen floor, stopping short of the tables and benches, and the button now reads State Info: Navmesh 0. Cover draws the cover positions in orange.
For collision, tick Collision Meshes at the top of the Render Filters panel — it shares the left-hand pane with the Search tab, and is only present while the viewport is enabled — and the level's collision geometry is drawn over the scene in solid cyan, as pictured under Collision & Physics. Check that your new geometry has collision in the right place.
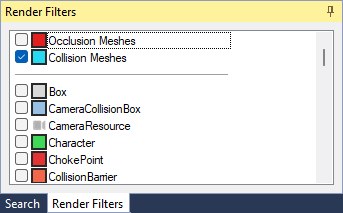
Occlusion Meshes and Collision Meshes sit above the divider in the Render Filters panel; the per-entity-type filters follow below it.
