After loading a level, open View → Model Editor to launch the Model Editor, shown below. It browses and edits the level's mesh package under RENDERABLE (e.g. LEVEL_MODELS.PAK / MODELS_LEVEL.BIN) — CS2 models used by ModelReference entities and other renderables.
The same window can open as a picker (with Select This Model) from a renderable instance's Change Model button.
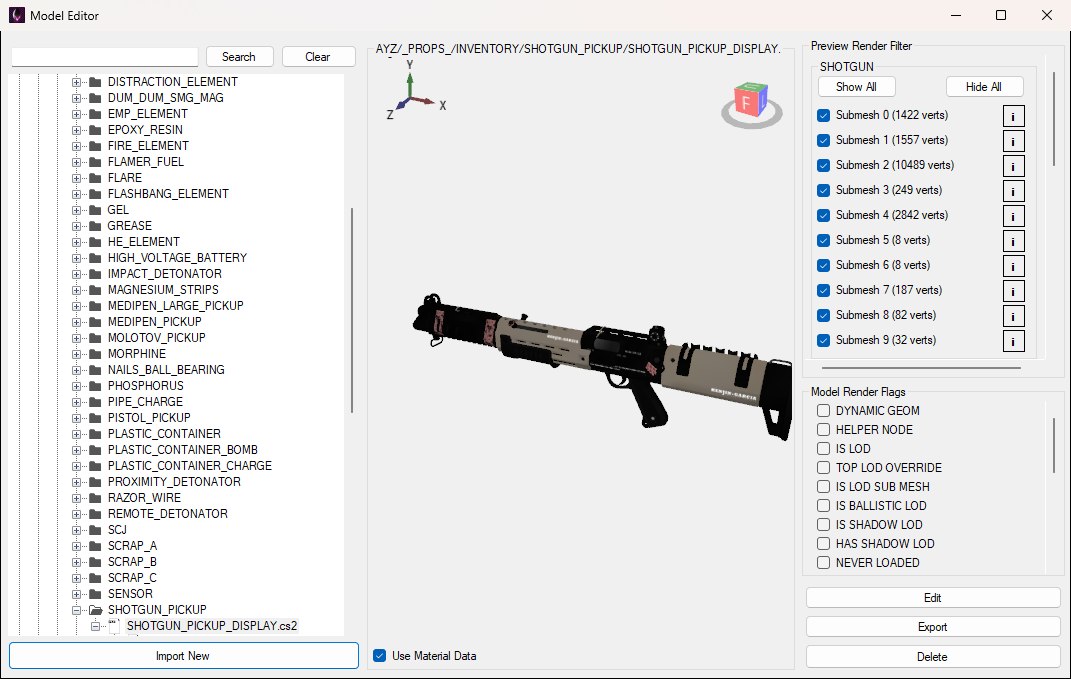
The Model Editor with SHOTGUN_PICKUP_DISPLAY.cs2 selected: the Preview Render Filter lists the SHOTGUN LOD's submeshes, each with an i button; the model's other LOD groups sit further down the same panel.
The left tree lists the level's models, grouped into folders by their names, as shown above. Use Search / Clear to filter. Select a model (its .cs2 entry) to preview all of it in the centre 3D view, or one of the numbered components beneath it to preview just that part; the preview's title shows what's selected, and Edit, Export and Delete on the right act on the selected model.
COL_ collision hulls start hidden even then. The i button beside a submesh opens a small info window (vertices, indices, triangles, and what its vertex format carries).Supported mesh formats: FBX, glTF (.gltf / .glb), COLLADA (.dae) and Wavefront OBJ.
FBX and glTF are written by OpenCAGE itself rather than through Assimp, because Assimp's exporters mangle exactly the things you care about — it resamples animation down to a handful of keys in FBX, and damages animated content badly in glTF. Those two carry everything OpenCAGE writes; COLLADA and OBJ go through Assimp and carry progressively less (OBJ has no skinning and only one UV set).
Models export at their real size. FBX, COLLADA and OBJ all treat one unit as a centimetre while CATHODE and glTF work in metres, so OpenCAGE applies the right unit scale per format — a model no longer arrives in Blender at a hundredth of its size.
Click Import New, pick a file, then use the import preview (shown below) to choose which meshes to bring in — tick or untick them in the tree on the left, and the preview follows. The line across the top says what was found: whether an OpenCAGE sidecar was read, how many components, LODs and submeshes the model will have, and how many materials will be built from the model's own textures, with how many textures that imports or reuses. You settle the model's name and any folders it should live in here too (use \ for folders), with clashes checked as you type — nothing gets silently renamed after the fact.
![The model import preview for TOOLBOX_DISPLAY: the status line, name, scale and composite rows across the top, the mesh tree with a [generate ...] material tag per submesh on the left, the Model Preview on the right showing the toolbox drawn with its own base colour texture, and the Pick material for selected, Edit generated material, Import and Cancel buttons along the bottom.](img/import-preview.jpg)
Importing a glTF with no sidecar: each submesh is tagged [generate …], so it gets a material built from the model's own textures unless you pick a level material for it; the Model Preview draws the toolbox with the base colour maps those materials will use, and the status line counts the materials and textures that will be created.
Also create a composite that places it is ticked by default: the import then also creates a composite named after the model (rename it, folders included) holding a ModelReference for it, so the model can be dragged into the level the moment it lands. A mesh skinned to one of the game's skeletons gets a DisplayModel composite with an EnvironmentModelReference on that skeleton instead, which is what a character's display_model looks up.
If a .cs2meta.json sidecar sits beside the file (see below), OpenCAGE reads it and rebuilds the model with the structure it had when it was exported, and pre-selects the materials each submesh used if the level still has them.
Imports need triangles (Assimp triangulates where needed), a usable bounding box, and under 32,768 vertices per converted mesh. Models are keyed by name when a level is read back, so a name that already exists is adjusted and you're told what it became — anything already placed still points at the original.
The Scale box multiplies the model as it comes in (the default of 1 keeps the file's real size, with the per-format unit conversion above already applied). The preview follows the value as you type. Resizing a skinned mesh pulls it away from the skeleton it's weighted to, so the box warns you when the model has bone weights.
A file that's skinned, or that carries animations, gets an extra row describing what OpenCAGE found:
Both need the game's animation data loaded; without it the row just says so and the mesh imports on its own.
An animated prop exported from the Animation Preview needs its .cs2meta.json sidecar to come back as it was, because that's where each part's placement is recorded. If the sidecar isn't there, the row warns in red that parts will come in out of place, and says what to name the sidecar so they don't.
Every submesh needs a CATHODE material. There are two ways to get one:
[generate …] for a planned material, or […] naming a level material you picked. The preview shows the base colour a planned material will use. Click Edit generated material… to see or change the plan for the selected mesh.The Generate Material dialog shows the shader type (family) OpenCAGE picked for the mesh and lets you change it, the material's name, and the textures taken from the model — which map fills which sampler, how it will be imported, and where it came from. A texture the level already has under the same name is reused rather than imported again. The shader features list shows what the chosen permutation turns on. OpenCAGE asks for a feature exactly when its map is present, which is how every shipped material is built, but only a permutation the level ships (or the shader database holds) can be used — when that exact combination isn't compiled here, the nearest shipped permutation is taken instead and the list follows it rather than the maps, so it can carry features no map asked for (the toolbox below gets EMISSIVE and RADIOSITY_STATIC that way). The summary underneath says when that has happened; building the shader database, or installing an HLSL compiler, widens what can be built. Tick Always create a new material to force a fresh material even where an identical one could be reused. Create Material hands the plan back to the import preview.
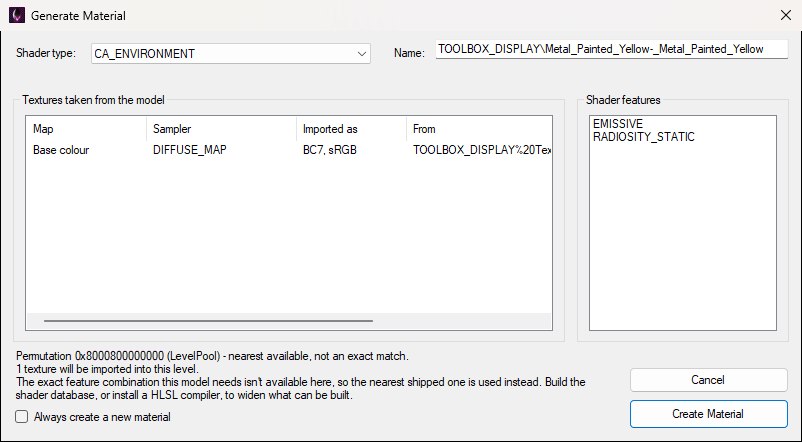
Editing the generated material for one submesh: the name is suggested from the model's file name and its own material name (characters a name can't hold become underscores), the base colour map was found beside the model and will be imported as BC7 sRGB (the From column shows the path as the glTF wrote it, spaces percent-encoded), and the summary explains that the exact feature combination isn't compiled here so the nearest shipped permutation is used — which is where its EMISSIVE and RADIOSITY_STATIC features come from.
Textures are imported in the format and colour space their role needs (diffuse maps as sRGB, normal maps as two-channel linear data, and so on), and everything a model can't tell you — roughness, radiosity behaviour, priority — is taken from a similar material already in the level, so a generated material starts from values known to work there. Nothing is written until you click Import; if a material can't be generated you're told why and can import without it, in which case those submeshes use the fallback material.
A model has no collision of its own: the game collides with a separate collision proxy (a Havok mesh in the level's COLLISION.HKX) that a ModelReference names through its Collision Mapping resource. Until now a mapping could only pick a proxy the level already had. The picker that opens from Edit Resources → Collision Mapping → Set Havok... can now make new ones, and the same window opens on its own from View → Collision Editor to browse, preview and import proxies without a mapping to assign them to (a proxy made there carries no physics material). The Collision Editor page covers the window in full; in short:
Either way the preview shows the triangles first and asks before writing. The new proxy then appears at the end of the list, selected, and Select Compound assigns it to the mapping as usual. Keep collision meshes simple: the game walks them for every ray and every step, so a few hundred triangles that follow the shape is worth more than the render mesh's every bevel, and a mesh that only needs to stop the player from walking through can be a handful of quads.
The proxy is written into the level's collision files when the level is next saved - both the 32-bit and 64-bit ones on PC, and the single 64-bit file the mobile and Switch builds ship - and carries the mapping's physics material as the game expects, so set the material on the mapping first if you can. It is placed in the world by the mapping's entity like any other proxy on Save and Build.
Props that fall, roll and get knocked about move by a physics system in the level's PHYSICS.HKX, which a PhysicsSystem entity in the prop's composite names through its Dynamic Physics System resource. The picker that opens from Edit Resources → Dynamic Physics System → Set Physics... now has the same two buttons as the collision picker: Import Mesh... for a model file, and From Model..., which opens on the model the composite already draws. The same window opens on its own from View → Physics System Editor to browse and import systems without a resource to assign them to, and to change a body's mass, friction and damping: see the Physics System Editor page.
A physics body is convex, so the mesh becomes its convex hull, simplified to at most 64 corners as the game's own props are: a concave model such as a chair tumbles as its outline. The preview shows the hull, then a dialog asks for the body's name, mass, friction and restitution. Like the game's own props, the body is named after the composite's model and placed where that model sits, so the two line up. Flat meshes such as decals and loose paper are refused, because a body needs volume.
The system is written into the level's physics files when the level is next saved - both of them on PC, the single 64-bit file on mobile and Switch - and Select System assigns it as usual; Save and Build then places it wherever the PhysicsSystem entity is.
Exporting a skinned model asks which skeleton to bind it to first, before the file dialog — a skinned model is only half a model without the rig its weights point at. The Choose a skeleton window (below) lists every skeleton in the game's animation data with its bone count and a Fit score — how far, on average, its bones sit from the vertices weighted to them — best fit first and pre-selected; skeletons with too few bones are greyed out. Search filters the list, Export uses the selected rig, and Export without one writes the mesh alone. The chosen skeleton is written into the file with the mesh bound to it.
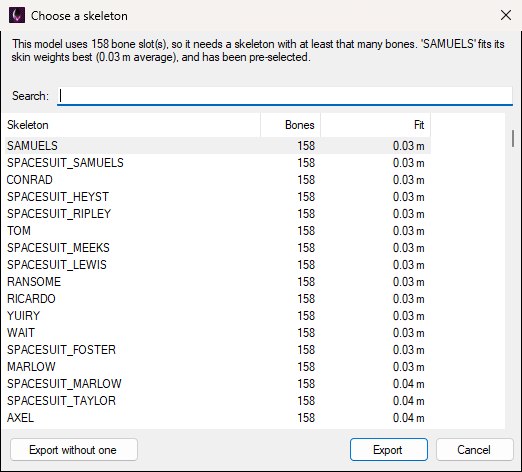
Exporting a mesh that uses 158 bone slots: the rigs that can hold it come first, best fit at the top, and SAMUELS is already selected; further down the list, a rig with too few bones is greyed out and marked too small.
Every export also writes a .cs2meta.json sidecar next to the model, holding everything the mesh formats can't carry: the component / LOD / submesh structure, render flags, vertex formats, and skinning data. Keep it beside the model and leave the object names intact, and the model can be imported straight back in as it was. The sidecar is named after the model's file, extension and all (chair.fbx.cs2meta.json beside chair.fbx), so if you save the model under a new name, rename the sidecar to match.
On the main window, the Model Render Flags group (on the right, under the Preview Render Filter in the first screenshot) toggles the engine's per-submesh flags — DYNAMIC GEOM, HELPER NODE, IS LOD, TOP LOD OVERRIDE, IS SHADOW LOD, NEVER LOADED and so on. A box is ticked when every submesh of the previewed model carries that flag, and ticking or unticking it applies to all of them. Changes apply in memory immediately.
Select a model and click Edit to open a second window, titled with the model's name, for that CS2's hierarchy: Component N → Part N: <LOD name> → Mesh N. Whatever you select is drawn in the Selected Preview (tick Materials for a textured view), Selected Info gives its name and vertex count, and the Utilities buttons change with the selection, as shown below:
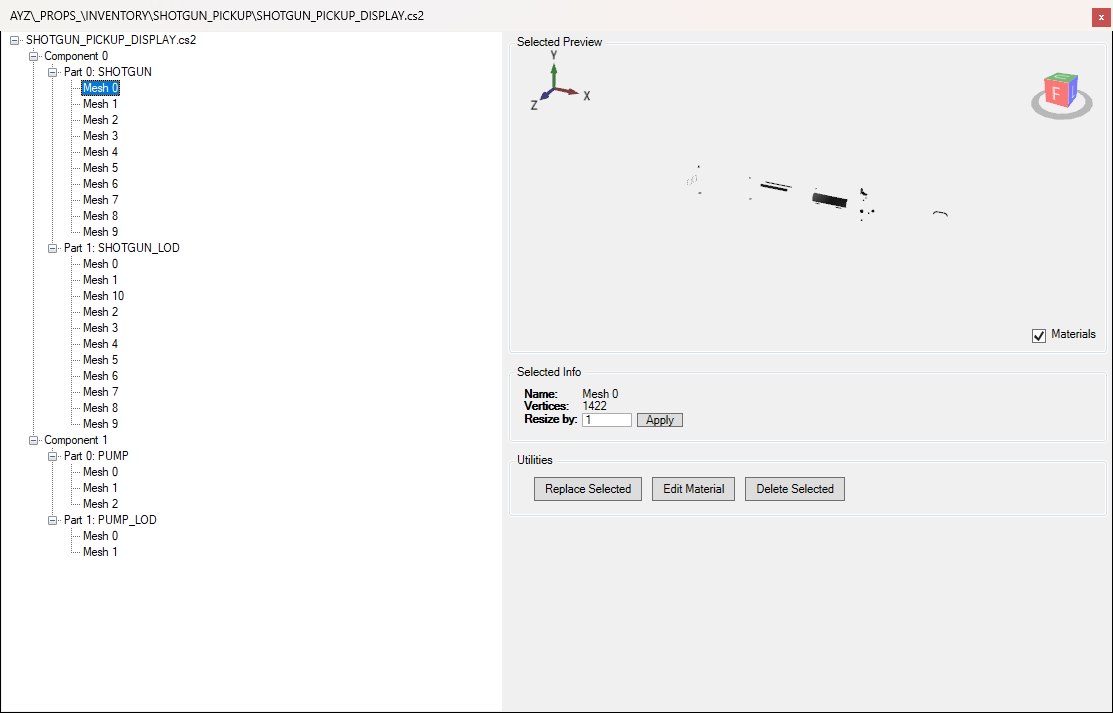
With a submesh selected, Utilities offers Replace Selected, Edit Material and Delete Selected; the Add buttons appear when a model, component or part is selected instead.
2 doubles it, 0.5 halves it) and click Apply to rewrite the submesh's geometry at that size. The box goes back to 1 afterwards because the resize is baked into the vertices, so apply it once rather than re-entering the same numberFor multi-mesh sources, prefer Import New with the mesh checkboxes; the per-submesh add/replace path only uses the first mesh in the file.
The Model Editor has no separate Save button. Persist changes with File → Save Level (Ctrl+S), which writes the level's model PAK/BIN (and related assets) back to disk. Model changes don't reach a running game over Live Link, which only carries script edits: save the level (Save and Build for new geometry) and load it in the game again to see them.
Saving closes the game if it's running so install files aren't locked.
