Open View → Animation Editor to browse everything in DATA/GLOBAL/ANIMATION.PAK — every animation clip the game ships, for characters and for props alike.
The editor lets you find a clip, watch it play on a model, export it to a DCC format, and bring new animation back in. It replaces the old raw PAK extract/repack window, which offered no way to see what a file actually contained.
This window is also what opens when you pick an animation for an entity parameter — see Using it as a Picker.
Cathode does not keep a flat list of clips. It asks for animation the way the game needs it, and the editor mirrors that:
# are the game's own grouping entries rather than characters, so they're sorted to the bottom of the list.One more thing worth knowing before you export anything: nearly every clip is authored on a shared rig and moved onto the individual character's skeleton at runtime. The Authored on column tells you which rig a clip was actually built against, which matters when you come to export or preview it.
As shown below, the window is split top and bottom: animation sets above, the clips inside the selected set below, with a Context dropdown between them. Drag the splitter to rebalance — the position is remembered, as is which tab you were last on.
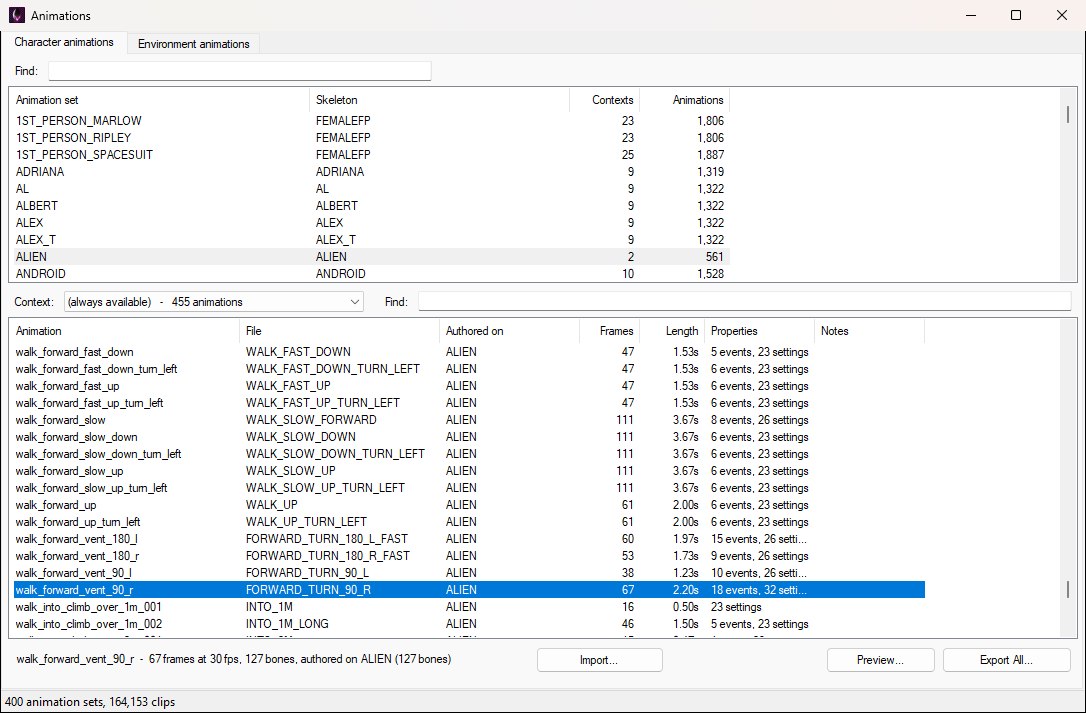
The Animations window on the Character animations tab: sets above, the clips in the chosen context below, and the selection summary beside the buttons.
Both lists sort by any column: click a heading to sort by it, click again to reverse. Numeric columns sort as numbers, so you can order by length or frame count and get a sensible result.
The set list shows the set name, the skeleton it uses, how many contexts hold clips, and how many clips it holds in total. A set with no clips left in it is greyed out.
When every set on screen is named after its own rig — which a search often leaves you with, though not the full list in the screenshot above, where the first-person sets share a rig — the Skeleton column collapses and hands its width to the names.
Pick a set and the Context dropdown fills with the contexts that actually contain animation. The unnamed one is listed as (always available), and each entry shows its clip count.
Each row describes one clip:
Hover a row for its full path, plus any non-standard metadata it carries — how far a locomotion clip travels, where an aim clip points, which sound an audio event fires and from which bone.
A clip that could not be read is greyed out and says so in Notes. That is a defect in the file rather than in the clip you asked for, and the rest of the list still works.
The line beside the buttons summarises the selection — frame count and frame rate, bone count, float tracks if it has any, and the rig it was authored on with that rig's bone count. The status bar along the very bottom counts the sets and clips in the PAK, and reports when it is being written.
The Find box above the set list matches set names and rig names first. If nothing is named what you typed, the search widens to look inside the sets, and the label changes to N with a matching animation — so searching for reload finds the sets that contain one even though no set is called that.
The Find box above the clip list searches the whole set rather than just the context on screen, whenever the set has more than one context. The label reads N across the set when it does.
Select a clip and hit Preview… (or double-click it) to open the Animation Preview window, shown below, and watch it play.
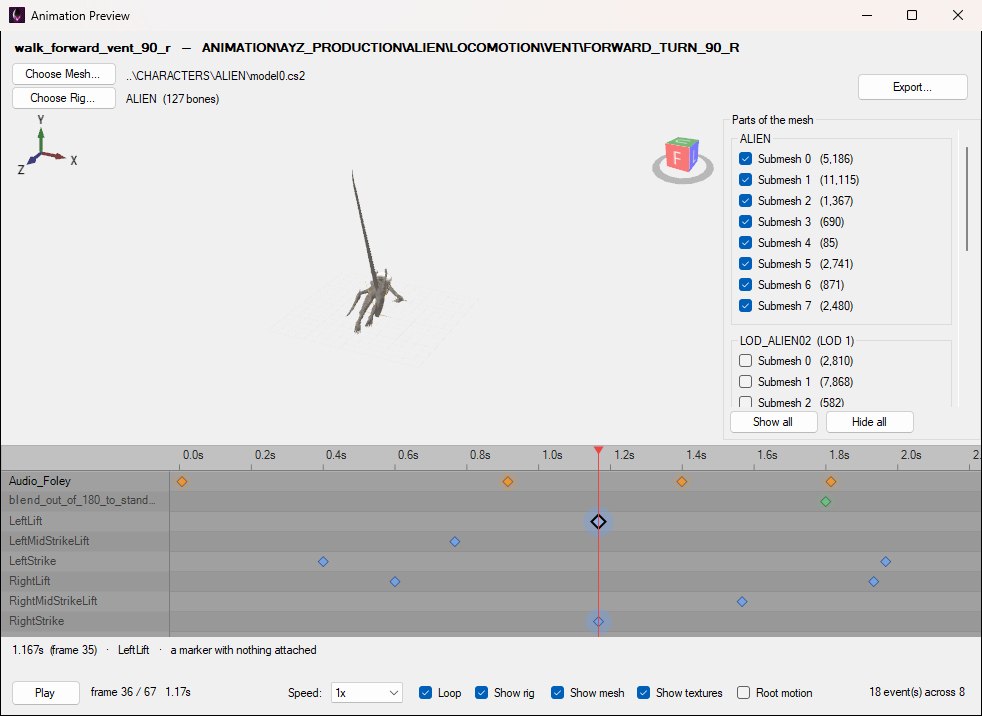
Animation Preview playing an ALIEN clip: the mesh above, the clip's event markers in lanes below.
Nothing in the game's data records which model goes with which animation set, so the first time you preview a set you're asked to pick one. Use Choose Mesh… to select a model and Choose Rig… to select a skeleton. Both choices are remembered per animation set, so you only do it once per character. A character's mesh brings its own rig: pick one and the preview moves onto the rig that mesh is skinned to, wherever the clip can be retargeted onto it the way the game plays it. The two lines beside those buttons say what's in use: the mesh, and the rig with its bone count — plus, when the clip was authored on a different rig, the route it was retargeted along. When something might otherwise look like a fault — a limb the clip never moves, an additive clip shown over the bind pose, a mesh that isn't skinned to the rig you picked, a clip authored on a rig the game's files don't hold — an amber note underneath says so.
For a clip on the Character animations tab, Choose Mesh… lists the skinned meshes in the open level that the clip can be shown on properly: those skinned to the rig in use, and those whose own rig the clip can be retargeted onto. For a clip whose rig the game's files don't hold, that means the characters with enough bones to play it. If nothing fits, every skinned mesh is listed, with a message explaining that the clip will play on it bone for bone. Choose Rig… opens the same Choose a skeleton dialog as an export; with a character's mesh on show, the rig that mesh is skinned to comes first and is pre-selected, marked the mesh on show. You can still pick another rig; if the mesh isn't skinned to it, the amber note says so and names the rig the mesh belongs to.
Playback controls:
Underneath the viewport is the clip's timeline of markers — the moments the clip fires something, one lane per event name. Click a marker and the line beneath the timeline says when it fires and what it does: a footstep sound, an effect, a gameplay callback — or, as with the marker selected in the screenshot, that it's a named moment with nothing attached.
Export… in this window writes out the clip and the mesh it's playing on together, with a prop assembled the way the preview draws it. As with a model export, a .cs2meta.json sidecar is written beside the file. Keep it there, renamed to match if you save the model under a new name, so that importing the model again brings every part back as it was.
Export All… writes every clip currently listed. Select more than one row and the button becomes Export Selected… and writes just those. Everything goes into a single file.
Available formats are FBX, glTF (.gltf / .glb) and COLLADA — the formats that can actually carry an animation. OBJ isn't offered here for that reason.
Because a large export can be very large indeed, OpenCAGE checks the clip count, bone count and frame count against the format you chose and warns you before writing if the result is going to be big.
Clips that couldn't be read are skipped, and the summary at the end tells you how many were left out.
An animation is only meaningful against a skeleton, so exporting opens the Choose a skeleton dialog shown below and asks which one to write it against. Each rig is listed with its bone count and how many of the clips being exported were authored on it. There's no guessing involved — the clips name the rig they were authored on, and that one sorts to the top of the list and is pre-selected. Everything else is there if you want to experiment with retargeting.
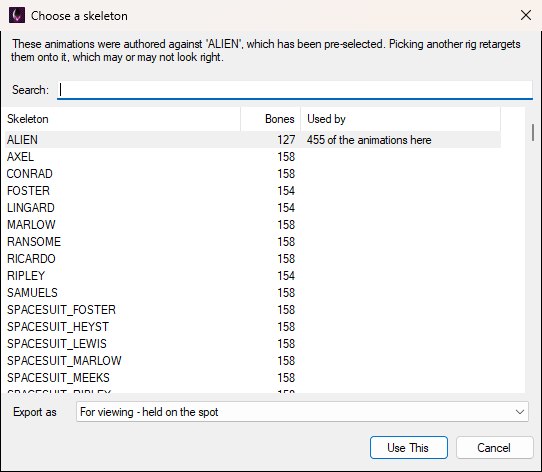
Export asks for a rig; the one the clips were authored on is pre-selected, and the Export as mode sits underneath.
The Export as dropdown at the bottom of that dialog decides what happens to bones the clip never mentions, and to the root. Viewing and re-importing want different things from the same clip:
A rig rests its root a long way from identity, so an export that looks right is not necessarily an export that can come back in. If you're round-tripping an animation, always use For editing and re-importing.
An animation you've edited in Blender can come back in as an FBX saved with Blender's default export settings. Blender thins out the keys as it saves, so set Simplify (under Bake Animation) to 0 in its FBX export options if you want every key kept as you left it.
Select the animation set you want the clip to belong to, then hit Import… and pick an FBX, glTF, GLB or COLLADA file. The Import animation into … dialog opens, titled after the set you chose and pictured below, showing what OpenCAGE found in the file and everything that has to be decided before it goes in. Nothing is committed until you press Import.
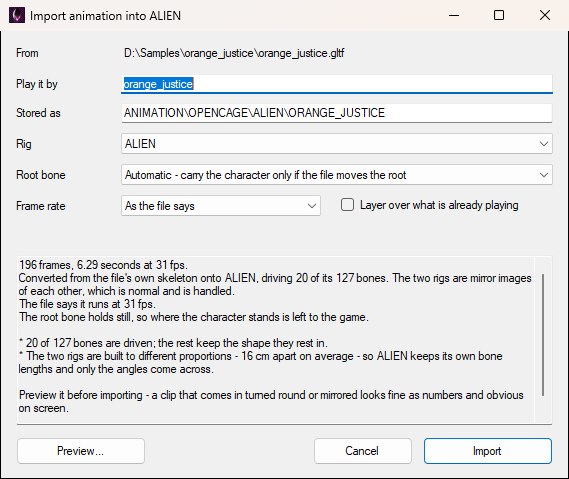
Import animation, reading a mannequin clip ("Orange justice" by Coldary on Sketchfab, CC-BY 4.0) onto the ALIEN set — the summary says it was converted rather than matched by name.
Once you do, the clip is added to the set and ANIMATION.PAK is written straight away — an import that isn't saved has done nothing, so there's no separate save step. The clip list refreshes with your new animation selected.
The summary panel updates every time you change something: how many frames and how long, how many of the file's animated nodes matched a bone on the rig (or, for a converted file, how many of the rig's bones it drives), what the file itself claims its frame rate is, and what will happen to the root. Use it to check the import before committing — if a file that should already be on the rig only matches a handful of nodes, something is wrong with the rig choice.
Preview… opens the animation preview on the imported result, so you can look at it rather than guess.
The root bone setting is what turns a character round. If an imported animation comes out facing the wrong way or sliding across the floor, that's the first option to revisit.
Import normally matches the file's nodes to the rig's bones by name, which requires the file to already be on that rig — in practice, that it came out of OpenCAGE in the first place.
Animation you find online generally isn't. Most of it is built on the Unreal Engine mannequin, which has different bone names, different proportions, and a different idea of which way is left. For those files OpenCAGE works out the corrective from the two rest poses and rebuilds the animation on the game's rig by itself — when it has, the summary reads Converted from the file's own skeleton onto …, as in the screenshot above, rather than reporting how many nodes matched by name.
There is nothing to switch on. The conversion is applied when none of the file's nodes match a bone by name, the file looks like a rig OpenCAGE recognises, and the Rig you chose is one it can build onto. A file that already matches by name is imported as-is; one that matches nothing and can't be converted is reported as This can't be imported, with the reason.
Both the humanoid rigs and the alien are supported targets. Bones the game's rig has and the mannequin doesn't — the alien's tail, spikes and jaw, a human's armour bones — keep their rest shape and ride their parent, which is normal rather than an error. In the screenshot above the mannequin drives 20 of the alien's 127 bones. The game's rig keeps its own bone lengths, too; only the angles come across. If the two rigs turn out to be mirror images of each other, the summary says so; that's also normal and is handled.
Animation parameters used to be filled from a plain list of enum strings. They now open this window instead, so you can see what a clip is called, how long it runs and what it fires before committing to it.
The window opens titled Choose an animation (or Choose an animation set), on whatever the entity is already set to — right down to selecting the animation itself and scrolling to it — and an extra button appears at the bottom between Import… and Preview…: Use This Animation (or Use This Set for an animation set parameter), which hands the choice back to the parameter, as shown below. Double-clicking a row picks it.
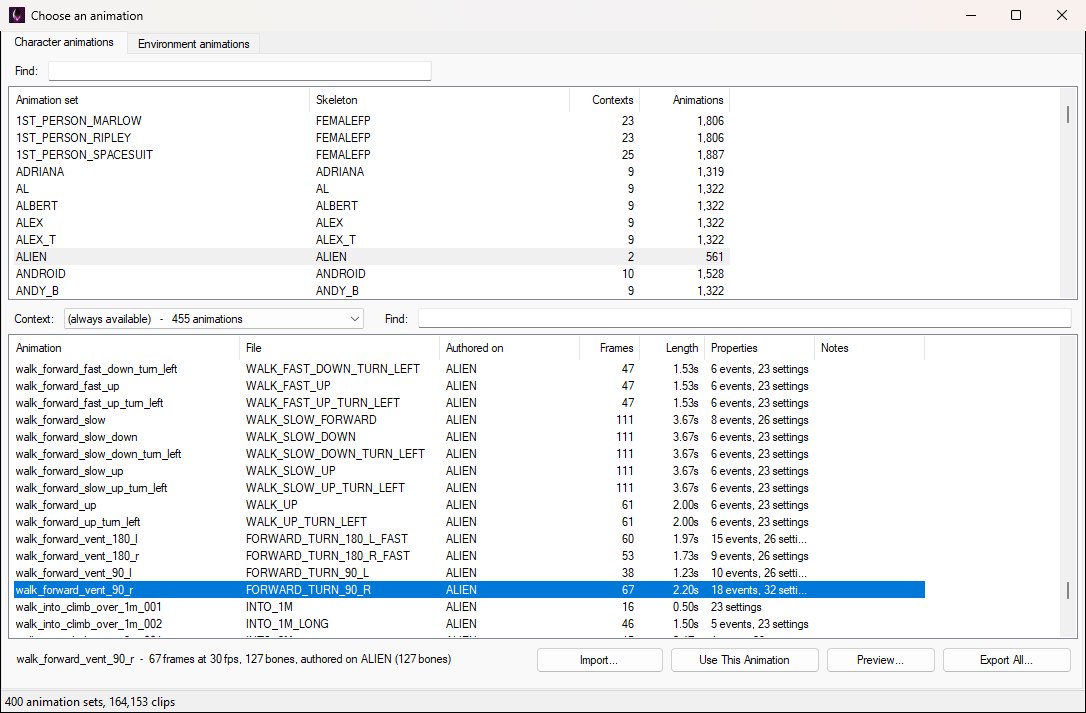
The same window opened from an animation parameter: the clip the entity already uses is selected, and Use This Animation sits between Import… and Preview….
An animation parameter stores the name the set plays the clip by, and an animation set parameter stores the set's own name. Neither stores a path.
